
Inspection hatch for checking gearbox oil level.
When checking the gearbox/overdrive oil levels in our cars it is a job that is easily neglected or overlooked due to the work involved in removing the center console which usually includes disconnecting the radio and or extra gauges, then removing the carpets then all the fixture screws that hold the gearbox cover. All this can take an hour or two easily double putting it all back in afterwards
I have put and inspection hatch in my gearbox tunnel which saves all of this hard work by gaining access to the top up plug to enable me to check and then top up with gearbox oil easily
The last time i removed the gearbox tunnel from my GT6 i took the measurements of where the top up plug was, I then transferred the measurements onto the gearbox tunnel and drilled a hole ( I kept the core of insulation for refitting to the cover)
I then found a bit of plastic from and old electrical joint bot lid. I then applied some heat to it so i could mold it into shape. I then fitter some rubber joint to the cover and fitted the core insulation to it. i then drilled a hole in each corner of the gear box cover and with the spring fasteners fitted in the gearbox tunnel allowed the cover to be screwed on with self tappers to cover up the hole.
THIS CAN BE DONE TO SEVERAL OF OUR TRIUMPH CARS.
MIKEY J


The Re-commisioning of a 1147 cc Herald Convertible
“Heraldry”
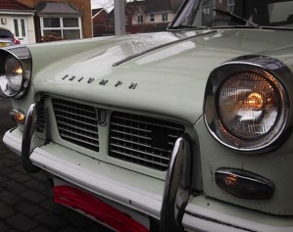
Just after Christmas I was asked if I would consider re-commissioning a Triumph Herald for a former (and now hopefully future) club member (name withheld by request). I visited her and had a look at the car in question and agreed to arrange to have it taken by trailer to my house to try to get it running and safe for road use on a limited budget. I asked the lady to send me a brief history of the car and the next paragraph is in her own words.
“It arrived at our garage in 1978 when my husband bought it from someone in work for £25.00. It looked tatty but was taxed and driveable. (Were MOTs in existence then? – Oh yes, BL) He used to spend a bit of time on it, turning the engine over etc. It was going to be his project “One of these fine days”! That just didn’t happen. It became mine in 1986 and had quite a lot of work done on it 1990 – 91, including a new hood, carpets and re-spray. It was used for pleasure and occasionally as an extra family car, for about ten years. I remember one of my sons wearing his waterproof trousers and jacket on top of his suit, when he used it to get to and from work while his car was being repaired! It was never that reliable, but made it to Cornwall once, and was spruced up and used as a wedding car twice, the passenger seat was removed to allow easier access for the bride and her dress!! In the last ten years it’s been in and out of MOT / SORN and not had much use, the last MOT being 2011. I’m now hoping it’s going to become as safe and reliable as possible so that It can be used this summer if we get some decent summer weather! “
Well after paying my friend £30 to use his trailer, van and to cover his diesel we picked the car up on February 1st 2014 on a cold wet wintry evening.
Here is the story as it happens on a day by day account, will I get it running?
02/02/2014
I had previously checked that the engine was not seized. As no keys came with the car my first job was to remove the ignition switch to take out the ignition key barrel. With this done I attached my TR4A battery and turned the ignition – nothing!
There was no cable connecting the starter solenoid to the ignition switch so I made one up, while carrying this out I noticed that the connections on the switch had at some time been connected wrongly, there was only power to the coil and generator/oil pressure lights when the switch was in the “cranking” position. I made the correct connections and the solenoid kicked in, but the starter motor did not turn. Checking with a test lamp I could see that power was getting to the starter so I removed the starter motor and gave it a quick service, with jump leads connected to it, it then kicked into life. With the starter re installed the engine turned over.
I then checked the ignition points which were in need of a clean and gapping, after I did this I set the timing statically. Next I removed the air filter from the Solex carburettor, set up a gravity fed fuel supply of fresh petrol and attempted to start the engine, no luck at first, but then after using ½ a can of easy start the engine burst into life and sounded very nice. I let the engine warm up and to my dismay I noted that the charging light stayed on. As I am working to a tight budget I did not want to have to fit a reconditioned dynamo and possible a control box so I removed the dynamo and stripped it down. I found that the brushes were seized solid and that all the internal components needed a good clean up. After I had accomplished this I re installed the Dynamo, started the car and the light went out – result, let’s hope it stays out! I then checked to see if the lights were working, they were not, the indicators are operated by a switch that has been placed on the dashboard and these did work. There is no horn push button for me to try the horn.
5 ½ hours work.
03/02/2014
After the Herald’s battery had been on charge for two days it showed signs of accepting a charge, whether it will hold it only time will tell, but I installed it and it started the car. At first the engine would not rev up cleanly so I removed the distributor; stripped it down and found that the advance and retard weights were sticking, so I gave them a good coating of release oil to free them up then gave them a good oiling with 3 in 1 oil; with the distributor re assembled and re installed the engine revved up nicely. Then with the engine running I checked for power at the light switch, there was nothing, rummaging around under the dash board I found a loose cable which when I checked it seemed to be the feed for the light switch via the ignition switch. I made that connection and now had power to the light switch, but nothing coming from the switch so I removed it and gave it a good clean, with it re installed most of the lights worked. I had to clean up the connections to the O/S headlamp and also take the registration lamp unit apart to clean the connections inside; I then had all lights working.
Next I carried out continuity tests on the cables coming from the horn to the switch that the owner had told me operated the horn, there was continuity there, but the horn did not sound. I removed the horn and after a good clean that was working too. I bought a horn push, but the operating pencil and ring had been removed, so I just fitted the horn push to tidy up the steering wheel.
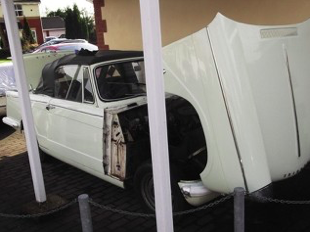
Next I turned my attention to the roof frame as there was the shank of a bolt snapped off at a hinge point. To remove this I had to carefully drill out the shank and re tap the thread. I bought a Spitfire type fitting complete with the nylon bush and washer and with this installed I was able to drop the roof down, however, I had to be careful as the webbing that holds the frame in position when the roof is up has either come away from its rivets or simply rotted away.
As the coolant mixture of anti freeze/water looked extremely weak and had probably been in the system for years I then drained the cooling system. With this completed I raised the car onto four axle stands so that I can access the underneath and the braking system.
5 hours work
04/02/2014
Well, lying on my back underneath the car showed it to be in very good condition and very solid with only 2 patches welded to the front out riggers, a shame as with a little more effort these could have been butt welded in place for an invisible repair (perhaps worth doing in the future when the car is back on the road?). I then removed all 4 brake drums, all flexi brake pipes and all the steel pipes that showed signs of corrosion, some pipes I had to cut through to get a ring spanner on the unions as they were rounded off, I also spent ½ an hour with a hacksaw blade cutting through the bolt that holds the rear three way connector to the chassis, very frustrating! Anyway with all the braking system dismantled I decided to strip down the front suspension as we all know that if not maintained correctly this area can suffer and become very dangerous. There was no sign of play in the trunnions so I was hopeful that they were in good condition. I removed the N/S brake backing plate to allow me to remove the lower trunnion, I found that the top seal was broken and that a previous “mechanic” had assembled it without the cup washers and seals which retain the lubricant. On the O/S things were worse, when I tried to unscrew the trunnion it was practically seized solid and I could see why, the banking disc at the bottom of the trunnion was missing which meant that this joint was running without lubricant ( and looked like it had been for a long time ) which had caused the threads in both the trunnion and the Vertical link to wear badly. I don’t think that the car would have managed the first corner on the way to the mot station without the Vertical link snapping off with the loss of the front wheel! A few years ago a friend had to change the Vertical links on his front Drum braked Herald and the parts were not available anymore, he had to convert his to Discs to get the car back on the road, which is a good, but expensive option. I checked the Rimmer on line catalogue and they were listed as in stock, so after a call to the owner with the bad news, a new O/S link and trunnion were on order along with top ball joints and trunnion seals and fixing kits.
5 ½ hours spent today
05/02/2014
I started the day by making up new brake pipes using copper pipe and new unions, 7 pipes altogether. I then turned my attention to freeing up the rear brake adjusters and with a bit of heat from my blow lamp and lots of copper grease they were working well. Next I tackled the front cam adjusters, 3 of them freed up with a bit of heat and penetrating oil, but the top front O/S had had its square bolt head sheared off in the past. I consulted the internet and could not find the part, Rimmer’s had “no longer available” so I spent the next hour setting up my MIG welder and managed to weld a nut onto what was remaining of the stud to obtain a functional brake adjuster. I then tried to remove the old brake pipes from the aluminium rear three way connector, but even after heating it up the unions would not unscrew without one of the threads stripping. A quick call to Chipmunk and I bought a new(ish) brass connector for £5 which he dropped off in his lunch break.
With the rain hammering down and the wind howling I did not relish the thought of lying in pools of rain water, but as I would have been on stop otherwise I installed the new brake pipes and brass three way connecter. While I was doing this the postman brought the new brake flexi pipes so I fitted the rear one and then completed the assembly of the rear brakes and adjusted them. To finish off the day I installed the front 4 way brake connector and connected the copper brake lines to it.
7 ½ hours spent today
07/02/2014
The new Vertical link, trunnion, trunnion bushes and top ball joints arrived late yesterday, so today I pressed the stub axle out of the worn Vertical Link and fitted it to the new Link, assembled the bushes in the two trunnions, fitted the top ball joints then assembled the front suspension. With this completed I assembled and adjusted the front brakes ( the front O/S brake only just came into contact with the drum on maximum adjustment, so I may have to fit new shoes). I then installed the two front stainless steel braided brake hoses and the rear O/S brake hose. I then connected all the brake lines. I used my automatic brake bleeder, but as it had recently on a Vitesse, it failed to purge the system of air and I spent a good hour with my son Jack pumping the pedal while I bled the brakes “the hard way”.
Next on the agenda was the installation of new seat belts, I had to make some reinforcing plates as the original fixings did not have any, I also had to alter the position of the top fixing as the seat belts were shorter than the ones I removed. I then used wax oil under seal to protect the fixings underneath the car. A frustrating day today as I wanted to achieve a lot more than I managed.
9 ½ hours spent today
08/02/2014
I spent the morning carrying out the following, first of all I freed up the corroded handbrake adjusting nuts and fittings, I then set the handbrake adjustment using new clevis pins and split pins. Next I poured in new antifreeze and topped the cooling system up with water. With the wheels fitted and front wheel bearings adjusted I lowered the car to the ground from the axle stands. I then started the engine and was pleased to note that the battery had held its charge. Next I installed the new headlight cowls. I then turned my attention to the windscreen washers and even after I blew compressed air through the pipes the manual pump would still not deliver water to the jets. A quick call to Chipmunk confirmed that he had an electrical pump spare from his TR6 and he would drop it in on his way home from work. When I tried to install the electronic ignition I read the instructions which said “NEGATIVE EARTH CARS ONLY” very frustrating as I had been in contact with the suppliers a few times and had told them it was a positive earth car and had supplied all the distributor details, I e mailed them immediately.
Only 3 hours spent today
09/02/2014
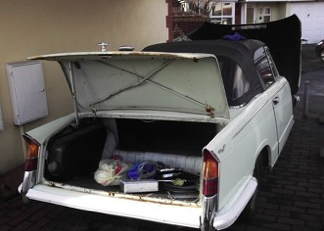
Using Chipmunk’s electric windscreen washer motor and a reservoir bottle he brought and a toggle switch I plumbed in the new screen wash system then made an electrical circuit with an in line fuse. Next I stripped the hood from the hood frame; the rear window which was already split and taped up then chose to split right across its entire width! I drilled out all the rivets that were holding what was remaining of the hood frame webbing then fitted new webbing. I then refitted the hood and made up a new pvc back window which I glued in place.
This took hours!
Next I adjusted the doors to give as good a “shut” as possible.
I then took the car for a test drive, driving a car with all round drum brakes took me back quite a few years, the car stopped (eventually) in a straight line but it will take a few miles for the shoes to bed in properly which poses a bit of a problem obtaining an M.O.T.
6.5 hours spent today
10/02/2014
The car would not start today and I traced the fault to the LT cable that connects the points to the distributer side connection, with a new cable made up the car started easily, so I let the engine oil get nice and hot then attempted to drain it through the sump plug, I say attempted because the head of the plug was completely mangled and I had to heat it up with my blowtorch then get a good grip with my mole grips before it would budge. It was lucky that I had a spare plug in my parts cache. With the engine oil/tar drained and the oil filter changed I filled the engine up with Halfords Classic 20/50. I called the mot station and booked the car in for 4pm, so the next hour was filled by inflating the tyres, (the front N/S tyre showed signs of degradation through age so I replaced it with the spare wheel), cleaning the car out and checking that all the lights, horn etc were still working, then just as I was about to leave I had a call from the mot station to say that their mot tester had gone home ill! I also had an e mail from the electronic ignition suppliers saying that I had ordered the wrong part and that the positive earth kit was around £15 more expensive, I replied telling them to read my e mails and the answers that they had sent and that they would soon see who was at fault, perhaps I will publish the messages in the Courier! I am awaiting a reply.
3.5 hours spent today
12/02/2014
The electronic ignition suppliers contacted me with an apology and the order number for the “correct” kit. I decided to keep the original one for my Spitfire so everyone was happy. I booked an mot for 3pm and went out to check the Herald, it started well and all lights etc were working. I thought that I would leave my house at 1:30pm so that I could give the car a run to bed the brake shoes in and ensure that if the car broke down I had time to either fix it or give the mot station plenty of notice that I would not be coming. I loaded up the boot with my tools and anything else that I thought I may need then noticed that the front N/S tyre was flat. I found a Toledo wheel with a good tyre and quickly fitted it to the car. With the gale force winds rocking the car I enjoyed the 10 mile drive to Fairwater Service Station and arrived there early. The car passed the mot with a few advisories that I will address before the owner picks up the car. The advisories were, welding needed on chassis, slightly worn O/S track rod end and new wiper blades required.
3 hours spent today, mainly at the mot station.
13/02/2014
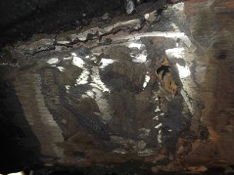
I raised the front of the car off the ground on axle stands giving myself plenty of room to access the area of the chassis that needed welding, where the front N/S out rigger joins the main chassis rail. After grinding back the area to good clean metal I painted the exposed area with zinc rich weld through primer. I then cut a patch out of 1mm thick steel and painted the face that would be against the chassis with zinc rich primer. The patch was then seam welded in place, the welds ground back and the area painted with wax oil rich under seal. I then slackened off the lock nut on the O/S track rod in readiness for when the new one arrives.
2 hours spent on the car today
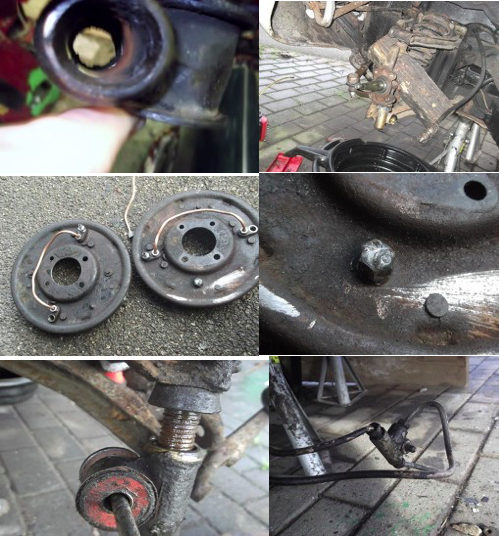
Bottom of Trunnion missing
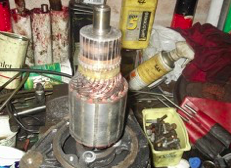
Dangerously worn Vertical Link
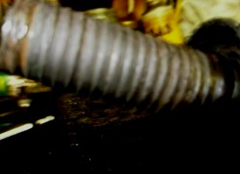
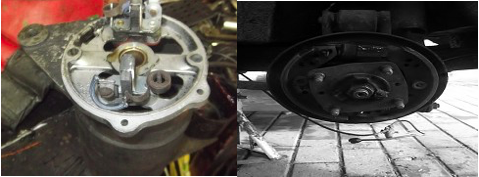
Dynamo in pieces
Lights working!
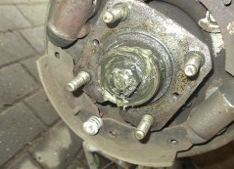
Front Wheel Bearing
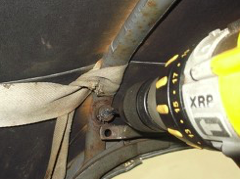
Drilling out Bolt
New Spitfire Type Bolt
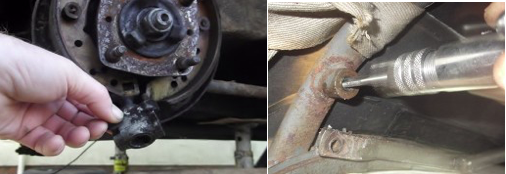
Tapping Thread
Nut welded to brake adjuster
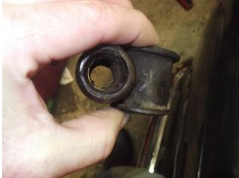
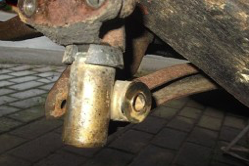
O/S Trunnion & Link
Trunnion seal split
Missing Blanking Plate means no lubrication
Seized rear o/s brake adjuster removed
N/S seized rear brake adj.removed
Seized Dynamo Bushes
Rear3 way brake connector hack sawed off !
New pipes & Bleed Nipples
N/S Front Suspension
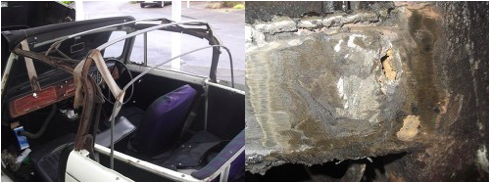
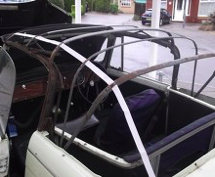
A Tangle of rotten hood frame webbing!
Chassis prepared for repair
Chassis prepared for welding
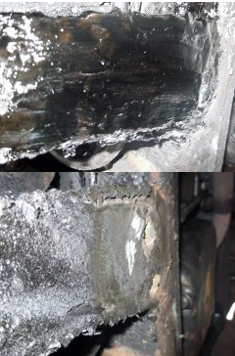
Holes in chassis exposed
Chassis repair finished!
Correct fitting on the left, incorrect brake pipe had been fitted on car
Old hood webbing made from old scraps
New webing on both sides
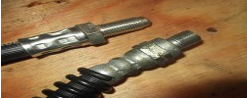
New vertical link trunnion & top balljoint
New trunnion bushes installed
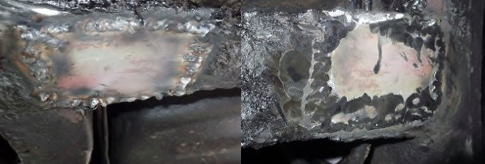
Repair patch seam welded
Welds ground back
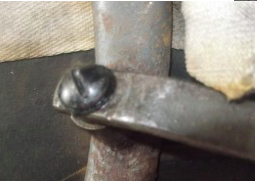
Track rod end fouling bleed nipple
Welding about to commence
New oil filter & sump plug
Patch painted with waxoil underseal
14/02/2014
The new ignition switch arrived today so I thought that I would install it as I was waiting for the other parts to arrive. The terminals on the new switch were all marked differently to the original and were also spade connections instead of the original screw lock type. This meant that I had to work out which connections to use for the cranking position etc and also that I had to change the connections on the very short cables to spades. With this finally completed I started the car and made sure that all lights and ancillaries were still working, they were. I then replaced the Toledo wheel with the original front N/S wheel as the car’s owner was going to take the car straight to a tyre fitter for new tyres and to have the tracking adjusted after they picked the car up from me.
This took 2 hours!
17/02/2014
The overtaking mirror arrived today so I installed it on the quarter light. I had bought some nice stainless steel windscreen wipers at the Bristol autojumble on the 16th so these were the next to be fitted. I then turned my attention to replacing the O/S track rod end which proved to be extremely stubborn, but finally succumbed!
The last item was the positive earth electronic ignition module which I installed following the instructions exactly, the result – no spark at the plugs. I contacted the suppliers who said that I must have installed it incorrectly (I can’t wait to see them at a future show), but I had not. I then replaced the points and the car fired up instantly. I think that it might be best to fit an entire electronic ignition distributor from a more reputable company,
2 hours spent today
18/02/2014
The owner arrived today with her son to pick the car up. Hopefully we will see her at one of our future meetings or/and runs. It was very satisfying to have helped to get this lovely little car back on the road and I hope that it gives the owner many hours and miles of pleasure over the coming years.
Hopefully I can now resume “Spitfire Hanger”
Cheers
Bern